前言
虽然可以为jupyter安装 jupyter-lsp 插件,实现 python 的 lsp 相关功能,但是编码体验仍然不如我平时使用的 neovim,在查阅github后,发现已有neovim插件实现了这方面的功能,不过配置起来略微有些繁琐,顾决定将操作步骤记录下来,以便于后者学习参考。
前置环境
我的系统和相关工具链版本
- OS: macOS 15.3 arm64
- Kernel: 24.3.0
- Packages: 171 (brew)
- Shell: zsh 5.9
- NVIM v0.10.4
- Pyenv 2.4.23 + Python 3.12.8
博主 neovim 配置模板用的基于 lazy.nvim 的 LazyVim ,所以一会儿也会将 molten-nvim插件中的教程转换为LazyVim插件的形式,其他配置文件模板请参考对应模板的语法。不过现阶段几乎所有的 neovim 模板都基于 lazy.vim,所以插件其实是通用的。
以下是一会儿需要用到的neovim 插件。
- (主要插件) GitHub - benlubas/molten-nvim: A neovim plugin for interactively running code with the jupyter kernel. Fork of magma-nvim with improvements in image rendering, performance, and more
- GitHub - 3rd/image.nvim: 🖼️ Bringing images to Neovim.
- GitHub - quarto-dev/quarto-nvim: Quarto mode for Neovim
- GitHub - GCBallesteros/jupytext.nvim: Jupyter notebooks on neovim powered by Jupytext
安装 molten 所需 python 依赖
此处参考文档1 和文档 2
其中,molten 会用到 python,博主使用 zinit 来管理 zsh 的相关插件,pyenv 是通过 zinit 来安装的,以下是我的配置参考
## pyenv
export PYENV_ROOT=$ZPFX/pyenv;
export WORKON_HOME=$PYENV_ROOT/versions
export PROJECT_HOME=$PYENV_ROOT/Devel
zinit ice wait lucid as"program" depth"1" cloneopts"" pick"$ZPFX/pyenv/libexec/pyenv" id-as'pyenv' run-atpull \
  atclone"echo pyenv installing at clone; export PYENV_ROOT=$ZPFX/pyenv; echo PYENV_ROOT: $ZPFX/pyenv; curl -fsSL https://pyenv.run | bash; $ZPFX/pyenv/libexec/pyenv init - | tee $ZPFX/pyenv/init.zsh" \
  atpull"echo pyenv updating at pull; %atclone" \
  atinit"source $ZPFX/pyenv/init.zsh;"
zinit light zdharma-continuum/null
在 molten的文档中可以注意到,他用的是 virtualenvs来管理插件所需要的 python 依赖包,这里我用的是 pyenv,所以使用的是 pyenv 自带的 pyenv-virtualenv插件来创建虚拟环境,原理大同小异,也可以自定义使用其他虚拟包环境管理器。
使用以下命令创建并激活一个名为 neovim 的虚拟环境,随后使用 pip 安装 molten 所需 python 依赖。
pyenv virtualenv neovim
pyenv activate neovim
pip install pynvim jupyter_client cairosvg plotly kaleido pnglatex pyperclip nbformat
接着按照文档,修改 neovim 的配置,使其能找到当前虚拟环境中的 python
这里要注意,请先使用以下命令查看自己的 neovim 虚拟环境安装目录中,python 的路径
echo $VIRTUAL_ENV/bin/python3博主的输出是如下内容
/Users/styunlen/.zinit/polaris/pyenv/versions/neovim/bin/python3所以接下来我就在 neovim 的配置里写以下内容,如果你也像我一样在 zshrc 中声明了WORKON_HOME变量为$PYENV_ROOT/versions,则可以使用下面注释掉的那个写法
vim.g.python3_host_prog = vim.fn.expand("~/.zinit/polaris/pyenv/versions/neovim/bin/python3")
-- vim.g.python3_host_prog = os.getenv("WORKON_HOME") .. "/neovim/bin/python3"这些都操作完之后,我们进入工作目录,比如我的工作目录为~/WorkDir/Comp,然后重新使用 pyenv(可以自定义)创建并激活一个包含数据分析、人工智能、数据可视化等常见python模块的虚拟环境common。
然后安装 ipykernel包,并添加一个名为 neovim 的ipykernel核心,用于 jupyter 后期使用。
以下是相关命令:
pyenv virtualenv common
pyenv activate common
pip install ipykernel
python -m ipykernel install --user --name neovim
配置 neovim
此处参考文档 3
主要用于添加
neovim对ipynb的直接编辑支持
由于我使用 LazyVim,所以单独编写一个 lua 文件来配置与 molten 相关插件。如不想看详细步骤,可以直接跳转到第二页复制完整配置
使用以下命令配置插件
nvim ~/.config/nvim/lua/plugins/molten.lua然后将最开始提到过的插件都加入其中,搭建一个框架
return {
  {
    "benlubas/molten-nvim",
    version = "^1.0.0", -- use version <2.0.0 to avoid breaking changes
    dependencies = { "3rd/image.nvim" },
    build = ":UpdateRemotePlugins",
    init = function()
    end,
  },
  { -- requires plugins in lua/plugins/treesitter.lua and lua/plugins/lsp.lua
    -- for complete functionality (language features)
    "quarto-dev/quarto-nvim",
    ft = { "quarto", "markdown" },
    dev = false,
    config = function()
    end,
    dependencies = {
      -- for language features in code cells
      -- configured in lua/plugins/lsp.lua and
      -- added as a nvim-cmp source in lua/plugins/completion.lua
      "jmbuhr/otter.nvim",
      "nvim-treesitter/nvim-treesitter",
    },
  },
  {
    "GCBallesteros/jupytext.nvim",
    opts = {
      style = "markdown",
      output_extension = "md",
      force_ft = "markdown",
    },
  },
  { -- preview equations
    "jbyuki/nabla.nvim",
    keys = {
      { "<leader>qm", ':lua require"nabla".toggle_virt()<cr>', desc = "toggle [m]ath equations" },
    },
  },
  {
    "nvim-lualine/lualine.nvim",
    dependencies = {
      "benlubas/molten-nvim",
    },
    event = "VeryLazy",
    opts = function(_, opts)
      table.insert(opts.sections.lualine_y, {
        function()
          return require("molten.status").kernels() .. " (ipykernel)"
        end,
      })
    end,
  },
  {
    -- see the image.nvim readme for more information about configuring this plugin
    "3rd/image.nvim",
    opts = {
      backend = "kitty", -- whatever backend you would like to use
      processor = "magick_cli", -- or "magick_cli"
      max_width = 100,
      max_height = 12,
      max_height_window_percentage = math.huge,
      max_width_window_percentage = math.huge,
      window_overlap_clear_enabled = true, -- toggles images when windows are overlapped
      window_overlap_clear_ft_ignore = { "cmp_menu", "cmp_docs", "" },
    },
  },
}
接下来的步骤主要是分布完成 neovim 对 jupyter 以下四个功能的集成
- 代码运行
- 结果预览
markdown中Python LSP的相关功能 (自动补全, 定义引用跳转, 快速重命名, 代码格式化等)- 文件格式转换
上述框架中已经完成了插件集成和联动,比如 lualine 显示当前激活的 ipykernel,但还没有添加快捷键映射、文件自动处理等功能,我们接下来根据上述框架,从上到下一一完善这个配置。
benlubas/molten-nvim
首先完善benlubas/molten-nvim插件的 init 方法,主要实现了以下几个功能
- 让
neovim能找到我们为molten插件单独创建的虚拟环境,上面有个地方就是添加此处配置,只不过我把他集成到了此处 - 开启一些官方推荐的插件选项
- 官方推荐的快捷键绑定
- 打开
ipynb文件时,自动初始化molten和quarto插件,并导入已有的运行结果数据;关闭时,自动导出运行结果数据 - 添加新建
jupyter notebook的指令
代码如下
init = function()
  local function getenv(var)
    local v = os.getenv(var)
    if v == nil then
      return ""
    else
      return v
    end
  end
  -- vim.g.python3_host_prog=vim.fn.expand("")
  vim.g.python3_host_prog = getenv("WORKON_HOME") .. "/neovim/bin/python3"

  -- I find auto open annoying, keep in mind setting this option will require setting
  -- a keybind for `:noautocmd MoltenEnterOutput` to open the output again
  vim.g.molten_auto_open_output = false

  -- this guide will be using image.nvim
  -- Don't forget to setup and install the plugin if you want to view image outputs
  vim.g.molten_image_provider = "image.nvim"

  -- optional, I like wrapping. works for virt text and the output window
  vim.g.molten_wrap_output = true

  -- Output as virtual text. Allows outputs to always be shown, works with images, but can
  -- be buggy with longer images
  vim.g.molten_virt_text_output = true

  -- this will make it so the output shows up below the \`\`\` cell delimiter
  vim.g.molten_virt_lines_off_by_1 = true
  -- these are examples, not defaults. Please see the readme
  vim.g.molten_image_provider = "image.nvim"
  vim.g.molten_output_win_max_height = 20
  vim.keymap.set("n", "<localleader>mi", ":MoltenInit<CR>", { silent = true, desc = "Initialize the plugin" })
  vim.keymap.set(
    "n",
    "<localleader>e",
    ":MoltenEvaluateOperator<CR>",
    { silent = true, desc = "run operator selection" }
  )
  vim.keymap.set("n", "<localleader>rl", ":MoltenEvaluateLine<CR>", { silent = true, desc = "evaluate line" })
  vim.keymap.set("n", "<localleader>rr", ":MoltenReevaluateCell<CR>", { silent = true, desc = "re-evaluate cell" })
  vim.keymap.set(
    "v",
    "<localleader>rv",
    ":<C-u>MoltenEvaluateVisual<CR>gv",
    { silent = true, desc = "evaluate visual selection" }
  )
  vim.keymap.set("n", "<localleader>rd", ":MoltenDelete<CR>", { silent = true, desc = "molten delete cell" })
  vim.keymap.set("n", "<localleader>oh", ":MoltenHideOutput<CR>", { silent = true, desc = "hide output" })
  vim.keymap.set(
    "n",
    "<localleader>os",
    ":noautocmd MoltenEnterOutput<CR>",
    { silent = true, desc = "show/enter output" }
  )
  -- if you work with html outputs:
  vim.keymap.set(
    "n",
    "<localleader>mx",
    ":MoltenOpenInBrowser<CR>",
    { desc = "open output in browser", silent = true }
  )
  local imb = function(e) -- init molten buffer
    vim.schedule(function()
      vim.cmd("MoltenInit")
      vim.cmd("MoltenImportOutput")
      vim.cmd("QuartoActivate")
    end)
  end
  -- automatically import output chunks from a jupyter notebook
  vim.api.nvim_create_autocmd("BufAdd", {
    pattern = { "*.ipynb" },
    callback = imb,
  })

  -- we have to do this as well so that we catch files opened like nvim ./hi.ipynb
  vim.api.nvim_create_autocmd("BufEnter", {
    pattern = { "*.ipynb" },
    callback = function(e)
      if vim.api.nvim_get_vvar("vim_did_enter") ~= 1 then
        imb(e)
      end
    end,
  })
  -- automatically export output chunks to a jupyter notebook on write
  vim.api.nvim_create_autocmd("BufWritePost", {
    pattern = { "*.ipynb" },
    callback = function()
      if require("molten.status").initialized() == "Molten" then
        vim.cmd("MoltenExportOutput!")
      end
    end,
  })

  -- Provide a command to create a blank new Python notebook
  -- note: the metadata is needed for Jupytext to understand how to parse the notebook.
  -- if you use another language than Python, you should change it in the template.
  local default_notebook = [[
      {
      "cells": [
      {
        "cell_type": "markdown",
        "metadata": {},
        "source": [
          ""
        ]
      }
      ],
      "metadata": {
      "kernelspec": {
        "display_name": "Python 3",
        "language": "python",
        "name": "python3"
      },
      "language_info": {
        "codemirror_mode": {
          "name": "ipython"
        },
        "file_extension": ".py",
        "mimetype": "text/x-python",
        "name": "python",
        "nbconvert_exporter": "python",
        "pygments_lexer": "ipython3"
      }
      },
      "nbformat": 4,
      "nbformat_minor": 5
    }
  ]]

  local function new_notebook(filename)
    local path = filename .. ".ipynb"
    local file = io.open(path, "w")
    if file then
      file:write(default_notebook)
      file:close()
      vim.cmd("edit " .. path)
    else
      print("Error: Could not open new notebook file for writing.")
    end
  end

  vim.api.nvim_create_user_command("NewNotebook", function(opts)
    new_notebook(opts.args)
  end, {
    nargs = 1,
    complete = "file",
  })
end,
quarto-dev/quarto-nvim
文档中在做这一步之前,需要先为 nvim-treesitter 添加一个新的选择器,方便我们在编辑ipynb时,快速上下跳转,可以输入以下命令快捷完成
cat >~/.config/nvim/after/queries/markdown/textobjects.scm <<EOF
;; extends

(fenced_code_block (code_fence_content) @code_cell.inner) @code_cell.outer
EOF
然后配置 quarto-dev/quarto-nvim插件的config函数,主要实现以下几个功能
- 将
code runner设置为molten,连接两个插件 - 使用一些官方文档推荐的配置和快捷键
- 扩展
nvim-treesitter插件
代码如下
config = function()
  require("quarto").setup({
    lspFeatures = {
      -- NOTE: put whatever languages you want here:
      languages = { "r", "python", "rust" },
      chunks = "all",
      diagnostics = {
        enabled = true,
        triggers = { "BufWritePost" },
      },
      completion = {
        enabled = true,
      },
    },
    keymap = {
      -- NOTE: setup your own keymaps:
      hover = "H",
      definition = "gd",
      rename = "<leader>rn",
      references = "gr",
      format = "<leader>gf",
    },
    codeRunner = {
      enabled = true,
      default_method = "molten",
    },
  })
  local runner = require("quarto.runner")
  vim.keymap.set("n", "<localleader>rc", runner.run_cell, { desc = "run cell", silent = true })
  vim.keymap.set("n", "<localleader>ra", runner.run_above, { desc = "run cell and above", silent = true })
  vim.keymap.set("n", "<localleader>rA", runner.run_all, { desc = "run all cells", silent = true })
  vim.keymap.set("n", "<localleader>rl", runner.run_line, { desc = "run line", silent = true })
  vim.keymap.set("v", "<localleader>r", runner.run_range, { desc = "run visual range", silent = true })
  vim.keymap.set("n", "<localleader>RA", function()
    runner.run_all(true)
  end, { desc = "run all cells of all languages", silent = true })
  require("nvim-treesitter.configs").setup({
    -- ... other ts config
    textobjects = {
      move = {
        enable = true,
        set_jumps = false, -- you can change this if you want.
        goto_next_start = {
          --- ... other keymaps
          ["]b"] = { query = "@code_cell.inner", desc = "next code block" },
        },
        goto_previous_start = {
          --- ... other keymaps
          ["[b"] = { query = "@code_cell.inner", desc = "previous code block" },
        },
      },
      select = {
        enable = true,
        lookahead = true, -- you can change this if you want
        keymaps = {
          --- ... other keymaps
          ["ib"] = { query = "@code_cell.inner", desc = "in block" },
          ["ab"] = { query = "@code_cell.outer", desc = "around block" },
        },
      },
      swap = { -- Swap only works with code blocks that are under the same
        -- markdown header
        enable = true,
        swap_next = {
          --- ... other keymap
          ["<leader>sbl"] = "@code_cell.outer",
        },
        swap_previous = {
          --- ... other keymap
          ["<leader>sbh"] = "@code_cell.outer",
        },
      },
    },
  })
end,
总结
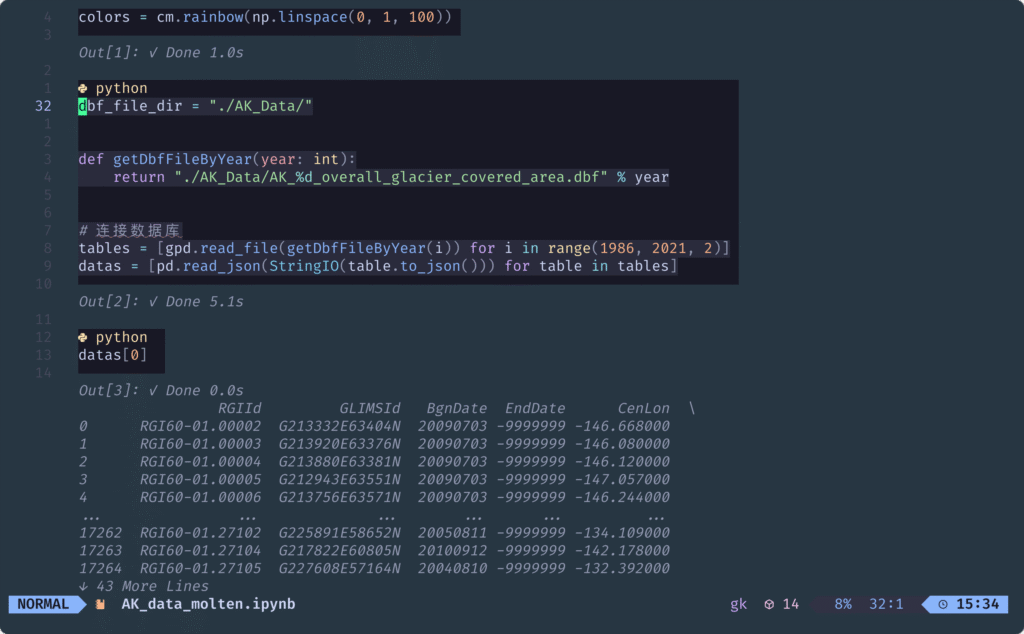
完成以上内容后,就基本完成了所有配置,我们进入工作目录随意打开一个jupyter notebook试试,OK,完成!


去年2025 年 2 月 17 号写的博客,现在才发出来(ฅ´ω`ฅ)